Monday, 18 November 2013

Talking about WIZARDS..

I have been lucky enough that some of my lovely customers have sent photos of themselves in their Radagast the Brown kit - two were dressed up for Halloween and one for a Renaissance Fair..  I wanted to share them with your all (with their kind permission).  

Leslie spent All Hallows Eve day at work dressed as Radagast -
with a very worrying clown.  She had a little birdie tucked under her hat :) and Sebastian the Hedgehog is perched on her shoulder
Kyle the Green stepping out on All Hallows Eve.
Kyle has the hat with the embroidered green band for tucking found treasures..  can you see his little birdie ?
Pete enjoying some sunshine at a Renaissance Fair

Don't they all look fantastic?!  

I know Leslie is planning to wear her Radagast to the opening night for the upcoming Hobbit movie :)  I wonder how many more of my hats will be worn to cinemas around the world in December.. 

xoxo

Sunday, 10 November 2013

One more wizard hat..

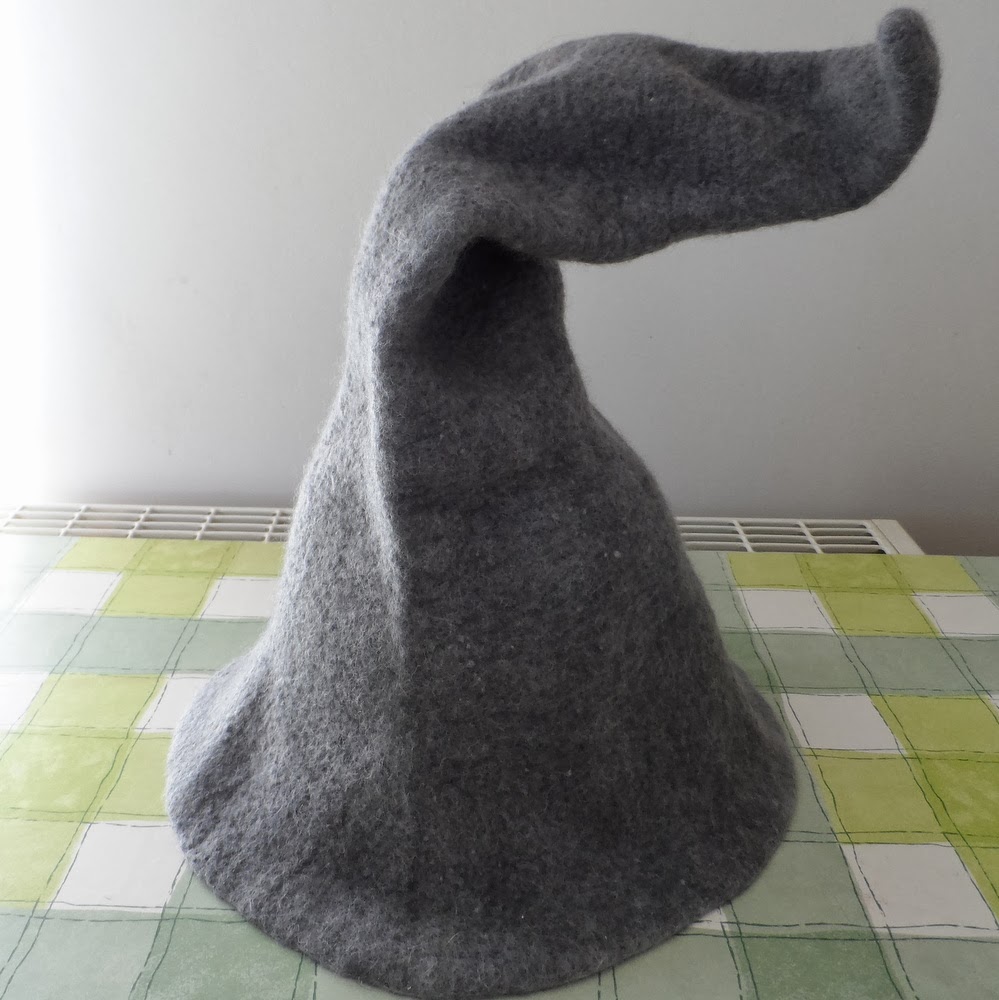
This is the one that I didn't show in the last post.  I've been wanting to do a Gandalf hat for aaages and just not gotten around to it.  A few weeks ago I DID!  But things didn't go to plan..  This was the first pointy hat I'd made in 2 years so had forgotten the past experience, which might explain a lot.

I wanted to make a long, crumpled and bent looking hat just like Gandalf wears in the films..  So I decided to use 4 layers, thoroughly felted, so it was strong and self supporting - I didn't want it to flop!  

I made a looong resist..  
 and enclosed it in 4 layers.  Inside was dark grey merino, then white Falkland, followed by 2 layers of lighter grey merino.  I worked it hard and felted it down so it was lovely and strong.. I net it into shape and it stayed there a treat
Drying on my big block (with cling film to keep the canvas block dry)
 The problem was it was just to long!  It did not look right at all!  And it wouldn't shrink down any more.. So I cut the end off!  Then cut a gusset so I could stitch it back into a point.  I did work the felt a little more and managed to lose the stitching a little.. it's still there but not really noticable.

I'm happy with the shape and length of the point now..
 and the brim looks better on than placed on the table top, it's still the same shape as it was on the block
Now I did catch my husband trying this on :) I've told him I want him to wear it to the Middle Earth weekend in Moseley next year :)  

But to be honest it isn't really any good for wearing.. it's too thick and stiff. Makes a nice ornament though , I think I shall offer it to the Museum where I used to work.. see if they want it for their Halloween displays, they often do fantasy events too so I reckon it would be a good home for it. 


Lesson learned = 4 fibre layers is just toooo much for a hat!  

Friday, 8 November 2013

More hats :)

Not going to say too much here.. just share a few photos with you :)  I've been making quite a few wizardly and Hobbit hats...  I think it may be because I'm excited for the next Hobbit movie - which I am planning to see on my birthday.

This Hobbit hat features my favourite .. hand stitched add-ons :)
2 new Radagasts.. one has gone to Ireland the other to Finland
A red Radagast-ish one
For some reason witches hats always seam to suit me :) 
I have one more wizardly hat to show you.. I don't have a finished photo to add so will have to take one tomorrow :)  There's a bit more to tell with that one anyway.

xoxo


Friday, 1 November 2013

A couple more hats..

I didn't take process photos with most of the hats I made over the last month or so.. but here are a few more finished hats :)
This is one of my favourites :)
I love stripes, spirals and buttons
I've done several berets..
I like this ones white silk on black/grey
And you know I love Celtic Labyrinths!
This has one on the crown.. you can't really see on the photo,
but there's a handspun chunky (purple) yarn with metallic sparkles
which runs between the green
Then I had a week where I was drawn to pastel stripes..
So I felted a big, bandy bowlerISH hat :)
And a cloche too :)
This hat was actually deeper than I wanted it to be.. so I cut it.
Removed a section so it was the right size and stitched the crown back on.
I added lines of simple embroidery and edged it with blanket stitch in some
lovely wool/silk yarns from World of Wool.
My goodness.. I really have done a lot of hats :)  and I haven't finished showing them yet lol!


I felted mittens to go with a couple of the hats..  

More hats (fun ones) next time :)

xx

Tuesday, 29 October 2013

Time has flown...

Again!  And we are well into autumn now.  This past few weeks have been sooo busy!  I've not been doing anything particularly exciting.. just getting on and doing everything that needs to be done and the time has flown.  

I thought it was high time that I stop by and give you a little felting update :)

I seem to of been felting lots of hats..  like this Top Hat

Which goes really well with my stash buster coat :)

A few ribbons torn from some FABULOUS silk fabric that I brought at
The Mercian Gathering (from Herts Fabrics stall - they have lovely fabrics)
Lovely blues, charcoal and smoky purple fibres
My equipment :) as explained below
I brought a polystyrene hat block and didn't want it to start crumbling if I got rough with it :)  so covered it with packing tape.. this has worked very well to protect and strengthen it!

My 'hat spring' is an improvisation too :)  When I was looking at buying one of these they were £15 each.. but I had a drive band for a spinning wheel which doesn't fit MY wheel.. it looked like it's made from the same stuff.. and it was plenty long enough for me to cut it up and make bands for both 22" & 23" hats..  I used a lighter to melt the ends of the band and push them together to join.  They're just what I needed - and didn't cost me a penny :)

As this was a tall hat, taller than my block actually
I stood the block on an upturned bowl for extra height while
I shaped the ridge around the crown

Stood on top of a vase to let the air circulate to it can dry faster :)
The silk fabric I brought at the Gathering is gorgeous stuff!  Made for a high end London dress designer who went out of business.  I brought this lovely burnt orange and a gorgeous red shot with black.. wish I'd brought the other colours now they had lovely blues and greens..  

I've felted a stole with the red..

The silk is on the inside

Anyhoo.. more hats next time :)
xoxo


Wednesday, 25 September 2013

Stash Buster Duster part 2

This is a little later than planned.. where did the last week go?!  But back to my stash buster..

I didn't have a piece of felt quite big enough to cut both sleeve from.. so I stitched pieces on until it was big enough :)
I got my sleeve template by drawing round the sleeve of my kaftan (in part 1)
After stitching the sleeves on.  I made them slightly long and flared
and with a slit up to the wrist at the back.
 I couldn't find suitable buttons for this.. so I decided to make a brooch instead

From a scrap I cut 4 rough circles
and freemotion machine embroidered (with my darning foot)
fairly tight spirals, starting at the centre and working my way out..
which gave them a nice slightly cupped shape
I added a brooch back and stitched the layers together by hand.
Reminds me of a Charles Rennie Mackintosh rose.

All finished :)


I am most definitely wider around the bottom than the top these days :)
so I found it necessary to add to the front rectangles around the bottom.
I stitched a long triangle to the front on each side.
The funny thing is it's the imperfections.. the 'make do and mends' that are my favourite parts..  the patchwork sleeve and hemline add-ons :)   Probably not surprising from a girl who loves darns and patches and wears them with pride lol.

Almost ready to go out..
don't forget your lipstick and high heels!
Being stupid :)

But where was I going?  Well.. do you remember back in March when I mentioned that I had been asked to put together a craft project for a local magazine?  Well the magazine has just been published!  And Friday was the launch event..  it was held at the Town Hall in the town where I was born, West Bromwich.  I don't have any photos but can tell you there was an abundance of tea and cakes, beautiful old china tea services and smiling faces.


And here's a glimps at the magazine :)

I must admit the 'local fayre' recipe for faggots makes me shudder..
I've hated them since I was a kid
The felt flower project got a 4 page spread!
Which meant that the interview and other photos all got cut, but hey
you can't tell someone how to felt a flower without explaining it can you ?!
xoxo

Sunday, 15 September 2013

Stash Buster Duster part 1

Well, in my last post I was felting meterage.. but how did it turn out and what have I done with it?

I felted 3 long pieces.. 1 wide for the back and 2 narrower for the front.. of the duster jacket I was planning to sew :)
 I had these lengths of lovely coloured nuno felt sitting there looking at me for months.. just BEGGING me to work on them.  This week I finally got round to it :)

I didn't have a pattern, or too much of an idea of how to construct a jacket, but as it's for me I can play around.  I used my old favourite kaftan as a template.. this is a soft, snuggly, thick and warm kaftan and I just love the simple shape.  The front and back are pretty much the same and the sleeves are dead simple too, so I decided to just adapt it to make a jacket.

I laid the kaftan on top of tracing paper and outlined it in pencil, then cut it out
Pinned the paper template to my felt and drew round it in tailors chalk..
this line would be my stitch line
Cut out leaving 1cm seam allowance
After cutting the back and both front pieces I pinned them together
and tried it carefully on.. just to check.  It was just right so I stitched the sides (leaving slits open at
the bottom each side) and shoulders
I didn't actually have 2 pieces big enough to cut my sleeves from..
so I stitched pieces together in a bit of a patchwork and cut them from that.

And I'm going to have to leave it there for now.. as I don't have photos yet of it all sewn together :)

Next time the sewing is finished and I work on (and hopefully finish) the closure xx

Thursday, 12 September 2013

Back to something FIBRE related :)

Stash busting has been an ongoing theme through 2013 for me.  The project that I am almost finished with right now, I actually started a few months back..

I had a nice green and navy silk sari that I just couldn't think how to use..  and I had several left over bits of batts that had gotten messy.. plus some tops that were knocking around... I decided to make some meterage, so bended the merino with silk fibres to get some nice bright batts.

I found some nice bright silk fabrics to add nuno interest
Laying out fine layers of batts over the silk sari.
The layout was approx 4 x 10 feet
After wetting and covering with builders plastic (it was laid out on builders plastic too)
my ridged roller came in useful for squeezing the air pockets out
With all the air squeezed out I wrapped the edges of the plastic up and over to completely
enclose the layout.. then rolled it round a damp bath towel
A dry towel wrapped round the outside and tied securely..
ready to pop in the tumble drier.. 
Once the fibres had started to creep through the silk I finished it off by hand.. making a nice sturdy felt, which I'll show you more of next time :)

x