Sunday, 21 April 2013

A new felt critter is born :)

Many of you will know how much I LOVE chickens.. Which is why it's a little surprising that its' taken me this long to felt one :)

I decided to make a cosy-critter chicken.. here he is

A quick sketch
Chicken shaped resist cut from foam floor underlay
Building layers..
The inside is white English wool - slightly spongy and very warm
The outside is dyed merino
2 more fibre layers to go.. time to root in the tail
Adding felted cords for the tail :)
Adding details
Speckled breast feathers :)
Part way through felting.. just after the resist was removed, but before healing the edges.
Chickens blocked and drying on my radiator
My chickens needed their combs!  I had never used commercial prefelt before..  but thought I would buy an A4 sized piece 'specially to try for this project.  I went for a nice bright red for his comb.. and as I was planning to felt 2 chickens I worked the combs together and cut them before finishing felting.

After working, cutting, healing the edges, fully felting, rinsing and drying :)
I decided to machine stitch the sections to create 3 chambers, which I stuffed with
wool fibre and hand stitched on to the heads
Finished 'em off with a couple of cute green button eyes :)
xoxo

Saturday, 13 April 2013

Serene Spirals

After working with all the lovely bright colours on my last lot of spiralling work.. I fancied working with some soft, neutral colours.  To be honest mostly because I have a LOT of the lovely chunky BFL boucle yarn (that I used in the spirals) naturally dyed in soft beiges and creamy tones, and I really want to start using them.

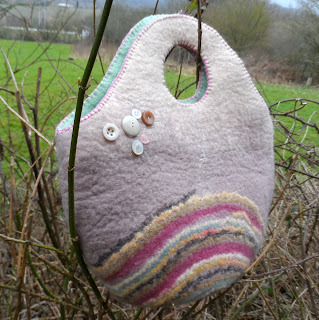
I decided to make a small tote bag with a Big spiral spreading up from the bottom of the bag.

Gathered all my soft, pretty fibres and some yarns together
Made bag and pocket resists
inner pocket design.. a pink and yellow spiral with cream tussah silk behind
6 fibre layers encase the bag resist
Drew a big spiral half on and half off the bag
After flipping it I carefully brought each strand of the spiral up onto
the second side and  placed it where I wanted .
Inner pocket.. love these pink and yellow spirals :)
I forgot to take photos for a while now :S  But I decided to cut the reinforcing for the handle from a lovely light green woollen blanket which I have fulled in the washing machine.  

I blanket stitched the reinforcing inplace with pretty pink embroidery thread
'Cos this was a shallow bag I think it needed a closure.
I use the sew on magnetic snaps.. they are kinder to the felt in the long term.
I stitch them onto patches of felt, then stitch the patches onto the bag
inner.. I think it distributes the force when pulling them open
This was the second side that I laid the spiral on
Added a random cluster of vintage buttons.. Oh how I love buttons :)
xoxo

Wednesday, 10 April 2013

Eco dyeing experiment :)

THIS time I was playing with the remnants of my beautiful Mothers Day bouquet :)  It had lots of gorgeous lilies and roses.. The roses faded first, and unfortunately I had thrown most of them away before thinking of dyeing with them (duh).  I only thought of it after wiping pollen from the lilies off my window sill ... it reminded me of India Flints book Second Skin (LOVELY book!) she has a piece of silk dyed with lily stamens in there.  

So, I left my last rose hidden away at the back of the vase until the lilies were done.. and then I chopped 'em all up :)

I decided to do 2 strips of white habotai/china silk.  One of them just wrapped around a stone, the other around a rusted 'cog' found on a Dorset beach a couple of years ago.

On the strip wound round a stone I laid lily petals as well as stamens

Bundling it around a stone

Tied up nice and tight

Ready for the pot
 I 'cooked' them for about an hour in vinegar and water, then left them in the pot over night.

This is how it looked when I took the lid off..
this is when it gets exciting - unbundling and seeing if it worked

Lovely windy day.. took only 10 minutes to dry :)

This is my favourite piece.. I LOVE the dark iron marks.  You can't see it on the photo but
there are some nice - though faint - rose leaf prints.  I didn't have many stamens on this piece.

The petals left no marks, and I didn't get much from the stamens on this one (and there were quite a  lot on).
The iron in the water left its mark on the parts which weren't touching the bottom of the pan

I was surprised at how little yellow I got on the silk..  look at what it did to my table as I unbundled them!!

Took a good 20 minuted scrubbing and bleaching to get these buggers to fade!
Lesson for next time: Unwrap on an old towel!

I've got a long way to go yet with this eco dyeing.. but it's definitely progress.  And the hunt is now on for more rusty bits n pieces..  and the ever elusive eucalyptus tree :)  

Monday, 1 April 2013

Bright Spirals.. the mystery object

Isn't really all that exciting to be honest :)  It's a brooch!  After making the hat I had a small off-cut piece of the stripy brim left over.  It was too small to be used for anything much.. but too pretty to NOT use.  So I made a brooch..  

I cut 2 small holes in the felt to push the working parts of the brooch back through,
then stitched it in place
Seen from the right side - nice and neat.
I hate seeing the metal bar, doing it this way saves me having to sew a patch over the bar to hide it :)
Pinned in position
Stitched with teal silk thread
Pretty turquoise button from my stash
Finished off with glass seed beads.
I tipped some on and remembered how they were scattered, then stitched them on  as
closely as I could to how they fell when I scattered them
The finished back

I got thinking about all the times that I've had pretty scraps and just bunged them in my 'recycling bag'.. where they get lost from sight in amongst bigger bits, and forgotten for ages.  I really enjoyed making this simple little brooch, and would rather use the pretty scraps up right away.. so that's what I'm going to do from now on.  And I'm going to try to remember to take photos and post them as 'Small Things' :)