Saturday 23 March 2013

Bright Spirals Hat

The snow is falling HARD and fast today.. the whole morning was spent as a family digging the road out, I was glad after an hour and a half of digging when other neighbours started trickling out to help.  I'll probably be stiff as a board tomorrow and the way it's coming down we shall have to dig it all out again!  At least it looks pretty.. and we don't have to drive anywhere this weekend.  Matthew has built a humungous snowman on the front garden, it must be 7 feet tall :)

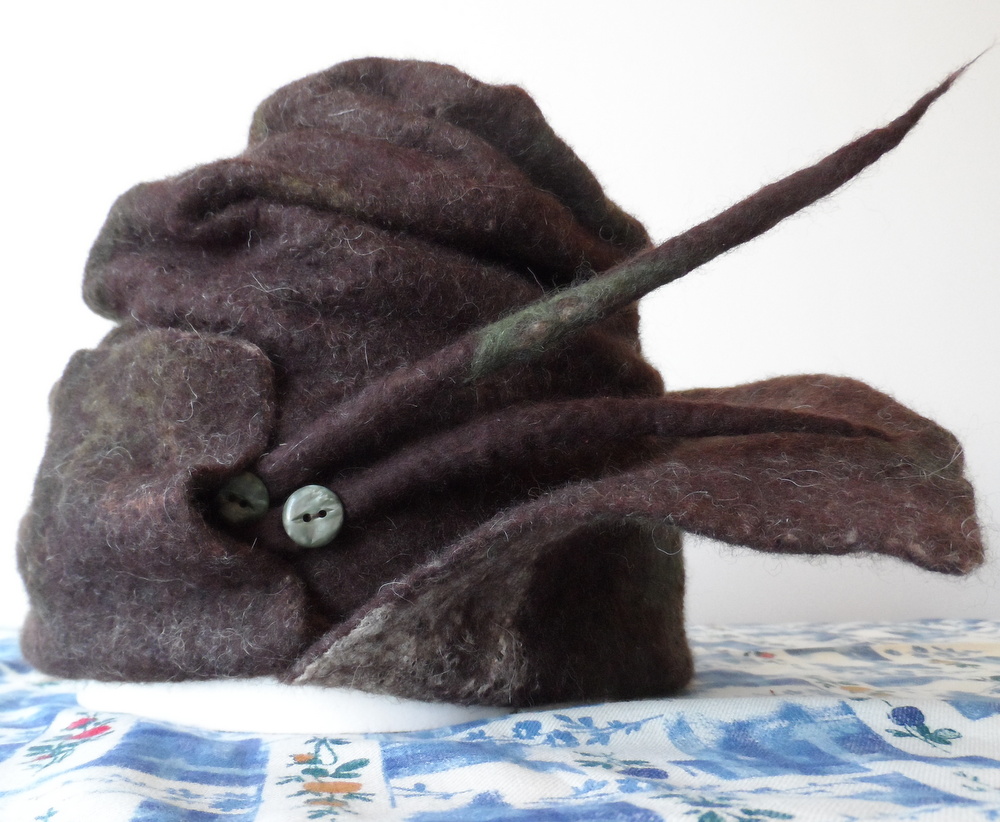
Today I'm showing you the buttoned bowler-ish hat 

I started off by making a beret over my usual circular resist, cut from foam floor underlay.  


The first thing I put down over the resist was some bright blue silk caps, followed by a layer of white, then a layer of coloured fibre.  On one side I 'drew' a spiral in the centre, then worked it as usual.  I forgot to take photos of this (what a memory!)  I used my hat block to shape the crown so it's more fitted than a beret.

Once the crown was felted I made a long narrow strip in the same fibres (1 layer each of white and coloured), and used thin strips of coloured fibre and yarn (the same ones as used for the spiral) to make stripes all along the length.  This long strip would become the brim.

I blocked the crown and left it all to dry
Pinned the brim in place
Then neatly hand stitched it
Not the look I wanted!
The brim needed more work
5 minutes in a steamer softened the felt up so I could mould the brim
I had a big fat felted cord in my scrap bag.. just the right size
I rolled the brim up and around the cord and pinned it in place, then left it to dry and set
Next day I added a row of quirky green buttons.. just for fun (and cos I have a secret button fetish lol)

I love the stripey brim :)
Have a good weekend
xoxo

Monday 18 March 2013

Bright Spirals details #1

The detail I wanted to look back at for the bags was pockets.. how I make integral pockets and adding simple decoration... 

I break off long thin pieces of top, or cut lengths of yarn
Rub a wet bar of soap on the resist to leave a soapy goo to hold the design in place
Draw the design
Cover design with layers of fibre that stick out about an inch past the size of the pocket resists.  I usually lay down 4 pocket layers.
Wet the fibre and position pocket resists
Continue laying out the rest of the bag and felting it.  I work it for a while after removing the main resist before I remove the pocket resists, to make sure the felt is good and strong on them (and they aren't going to felt shut as soon as they are removed - easily done if removed too early).

Felt is nice and solid, I've turned the bag inside out and worked the felt.
Now I can  see the resists all bunched up inside - its time to cut them out
I 'heal' the edges with wet soapy fingers and work the felt some more before actually taking the resist out


Next time: My button embellished bowler(ish) hat :)
xoxo

Friday 15 March 2013

Bright Spirals :)

This post is a little different to my normal ones :) I'm going to show you all the finished work up front, and then go back and look at a bits in more detail over a few short posts, that way it's not too long a post lol.

A couple of weeks ago I mentioned that I was going to start work on something bright, and Hundertwasser-ish.. For anyone who didn't read my blog back then, I felted quite a few pieces inspired by Hundertwasser last year (there were a few posts, this was the earliest).  I really fancied making another spiral bag, and wanted to use my favourite of the earlier bag colour combs for the background; dark duck-egg and bilberry.

My Hundertwasser inspired week :)

As you can see, I enjoyed it and got a bit caught up in the theme.. I did have a very productive week though!

xx

Thursday 14 March 2013

Update

Just a quicky today.. I promised to post pictures of my Radagast #2 hat on its' new owner if he didn't mind me doing so..  The hat arrived about a week ago and Pete sent me a couple of great photos which he is happy for me to use :)  

Looking very wizardly
Pete is putting together a Radagast costume to wear to Renaissance Fairs' and festivals this year .. sounds like he will be having quite a bit of fun!  The lovely thing is that he is planning to wear it out of costume in the colder weather too, to keep his head warm :)

I watched The Hobbit for the second time over the weekend.. and OMG I loved it just as much second time around.  There is something so satisfying at seeing a book that you have been imagining since you were a child brought to life .. and done so very well!  I love it.  I remember the first time I watched The Lion The Witch and The Wardrobe (from the new Narnia films) I was on the verge of tears most of the way through.. I'd been imagining it since I was about 7 (when I read the book for the first time) and there it was JUST the way I'd imagined it.. beautiful.  The Hobbit doesn't have quite that effect on me but only in the sense that I don't wanna cry - I think it is wonderful, it's such an amazing thing when an old favourite book turns out on screen the way it was in your imagination..

It's been a funny old week here.. the weather has been strange - gorgeous bright spring sunshine, then snow storms that could blow you off your feet and cut visibility right down, followed by bright sunshine like the snow never happened.. all within the space of an hour or 2!  And it keeps on doing it.. weird.  This morning is eye-watering bright sunshine, but cold. I've been quiet the past week or so, not feeling very well I needed to hibernate a little bit..  but now I'm feeling better I need to start showing you what I've been upto :)    Soon, I promise x


Thursday 7 March 2013

Scarf #4 (and 5 & 6)

My fourth scarf was a light and lacy featherweight with cobweb lace edges..

I was thinking of summer days and coastal walks :)  I wanted to blend lots of lovely blues; merino and tussah silk  with natural creamy white tussah.  Time to get the drum carder out :)  I picked the fibres and arranged them on my workbench in the order that they would go through the carder.


This is my first step when I'm making a variegated batt.
Starting on the right I feed each fibre through the carder, one on top of the other.
After the first pass through the carder it is a big layered 'sandwich'
I split the bat into 4 along the length.. then holding what was the top and bottom layer of the batt
I pull each strip gently apart to open up the layers
And feed it through the carder again (2nd pass)
These batts had 3 passes through the carder, I wanted them to be very subtly variegated.
For the third pass I peel thin layers off the batt and put it straight through the carder.  I drizzle extra silk straight onto the fibre on big drum in places where I felt it needed more silk or colour variation 
I wanted to felt the batts as they were, so I split them into very thin, even layers.. and layed them out in two perpendicular layers.  Around the edges I left a fringe of fibre that did not have a perpendicular layer over it.. that became the cobweb lacey border.

Laying out my wrap.  This was longer than my 8 foot table, so I had to wet it out, roll half of it up and move it along the table in order to finish the layout.
You know how the felting part goes :)  Here's the finished item

Wide enough to wear as a wrap / shawl
Fine enough to bunch up and wear as a scarf :)

I am so loving colour at the moment!


I really enjoyed blending my batts and felting from them.. not having done it for a while, so decided to make a couple more.  I had the painting  Flaming June by Lord Frederic Leighton stuck in my mind.. so of course you can guess the colours I went for :)


Looking back at the photos, I guess they're not all that Flaming June-ish.. but it satisfied my need to make something soft and flowing in similar colour :)

xx

Sunday 3 March 2013

An unexpected return to Middle Earth :)

I had a lovely email from a gentleman in the US who loved my Radagast hat, and wanted to know if I could make one for him.  Of course this was the perfect excuse to make the Radagast #2 :)

This hat needed to be bigger as it was to fit a mans' head, but it also needed to be a more masculine version than the first hat.. more like the one in the movie.  So the crown needed to have a lot more to it.. so it could be wrinkled and crumpled on top of the head.. and the brim needed to be much more chunky and less dangly.


New resist.. a simple bell shape.
Liberally scattered with silk caps
I used three fine layers.. the first is dyed merino
The second is natural brown merino which is a little coarser / hairier.
On top of the second layer I scattered lots of tussah silk fibre in browns and black
The third layer is dyed brown merino, with a little green merino
and quite a bit of tussah silk fibre and silk caps plus a little white flax fibre
I must of gotten carried away with the felting.. I forgot to take photos for a while.  But I worked it, and worked it.. a LOT!  When it was fully felted and had shrunk down by half, I cut a wedge out of the front (where the face will be) and created the front flap separately.
Healed all the edges, and set the hat on the block to dry.  The sides
and back are folded up and there is plenty of hat on top :)
I let the front flap dry slightly crumpled.
Once it was dry I stitched that widest edge of the flap
to the front of the hat.  Then stitched the felted quills in place and added a couple of buttons

Love this one!
I think the new resist shape is the way to go with this
I got the worn, weather beaten look I was going for :)  Its nice and soft and snuggly.. not heavy or stiff 'cos the layers were laid down really fine.  Hope it's new owner is as happy as I am when it arrives.

I had a little fun with the box that I posted it in :)


I thought that a fellow Tolkien fan would like to know that it came from 'his neck of the woods'.
Trouble was my laptop battery was about to dye and I didn't quite have time to get the wording right (it shouldn't read 'and found' should be 'he found' .. never mind)

Next time.. the last of my current scarf posts :)
xoxo