Saturday 22 December 2012

Wishing you..

Wishing you all
a wonderful Christmas &
a peaceful, prosperous and healthy 2013!

Origami star
I found a tutorial for this origami star over on Pinterest and couldn't resist making one.  It was easy.. up to the point where your fit all the pieces together... that is definitely the tricky part!  I couldn't close mine up any more than this so cheated by filling the hole with coloured paper ;)  This link should take you to the tutorial and you can see how the stars are supposed to look.  The tutorial is written in Norwegian translated by google, but the pictures speak for themselves..

I also found a tutorial for some really cute paper roses for gift-wrapping.. I made two and they were wonderfully easy and looked lovely - but I totally forgot to take a photo of mine, here is the tutorial link..  this one is all in pictures - go take a peek they are lovely and sooo easy.

That's it from me 'till after the Big Day  xx

Friday 21 December 2012

This week


I can't really share that much about my latest felt.. too many pieces will be given as Christmas pressies and I don't want to spoil any surprises.  Something I can tell you about though..

I recently had some of small pieces of felt in our local museum shop :) it's the first time I've done this and I was quite excited to be honest.  Most of the bits I sent were things I had made for a Christmas fair last year which turned out to be a total waste of time..  I haven't done a fair this year so I took my bits 'n' pieces to Haden Hill instead.   The top three shelves have my stuff on and the jewellery at the bottom was made by my lovely sister-in-law.  


First time I used my new display materials..
Gary made me a lovely, sturdy pin board to hang my brooches and keyrings from.  I'd planned to paint it but changed my mind at the last minute.  Deciding instead to cover it with pages from Gary's first dictionary - the poor book got quite badly damaged when we moved house but I just love it.. it is SOooo 70's, the pages are discoloured with age.. and it belonged to my man when he was just a little boy, which is quite endearing to me.   I pasted pages onto the hard board completely covering every surface apart from the pegs, then painted PVA glue all over to give it a nice soft sheen.


My old camera didn't focus very well in poor light
I made some new information boards too and covered them with the dictionary pages.. I mounted the info in the centre and you can see the vintage paper around it.  The info boards were a last minute quick fix 'cos I couldn't find my old one.. I just used cardboard from a strong box, and even though they are just card, now that they are covered with the paper and PVA'd they are as strong as if I had made them from hardboard.. I was quite surprised at that.  The museum closes from Christmas to March so I went to collect our stuff yesterday and we have both made quite a few sales - yay!

I had lots of lovely birthday wishes from readers, on the comments here and as convos from my Etsy shop - thank you all!  It meant a lot that you took the time to get in touch :)

My birthday was lovely.. it didn't go quite as planned, Rachael has been ill all week with a really nasty cold (she is feeling better today) it would of been silly to drag her out to the cinema so we shall go another day.  I did manage to catch up with my friend Clare who treated me to a lovely homemade soup lunch - thank you Clare :)   And Gary brought me a very smart new camera for my birthday.. it has WIFI!  I can send pictures straight from the camera to my computer from wherever I am.. I think.  I just need to work out how to use it lol.  I am hoping that it will be useful for a couple ideas I have for the new year.

OK.. now I have to go finish writing Christmas cards..

Sunday 16 December 2012

Not quite enough to pull Santa's slay..

I've been felting seamless Reindeers.. I made 4 teacosies and had a request for a bigger one turned into a doorstopper.  At one point I looked up from my work and saw this line up..
Only one has his face embroidered on..
Which really made me smile.. I just needed a felted slay behind them and they could of been my Christmas card picture :)  Here's a quick glimpse at how I made them:

The first things that I made were the antlers and tail.. to keep the fluffy ends dry while I was felting them I tightly wrapped them in cling film / plastic wrap.  I rooted them in between the fourth and fifth fibre layers.


After cutting out a reindeer shaped resist from foam floor underlay I covered it with several layers of white Norwegian wool fibre
The first 2 layers.
Who would guess that under this big fluffly mound 
of white fibre is a reindeer shape :)
The fifth and sixth layers are coloured merino.. browns to draw the reindeer shape.. fifth layer was green around the bottom.


On the sixth layer I covered the green with white merino and scattered some linen fibres


adding the antlers

Part way through.  This is pretty much felted, you can see the white fibres have crept though the colour & the green has crept through the white (reminds me of grass peeking through snow).  I use my ridged rolling stick to really harden the felt.

After drying him stuffed with tea towels to keep his shape, I stuff the head with wool fibre - and seal the inner neck to stop the stuffing falling out :) then embroider the face on

Now they all have their faces :)
The one in the middle is a tea cosy, the others are door stoppers.  I only needed to make one door stop, but the first (on the right) didn't quite turn out as I wanted - I used all merino fibre and the white didn't creep through to make the reindeer heathery so I made the second one to be sure it had the finish that my customer liked.  

The doorstops have weighted packs with leather bases sewn into the bottom

An update on my slippers TV appearance..  I did manage to find the report on the internet but unfortunately they hadn't used that footage  :(  The lovely lady with the Faerie slippers had been interviewed for an hour or so on different aspects of internet shopping and they used the bit that fit their story.. never mind.  The main thing is how happy that my lady is to of mentioned them in the first place! 

It's my birthday tomorrow and I'm meeting a friend for lunch, then going to the cinema (to see the Hobbit) and having dinner with Gary and the kids.. should be a lovely day.

xx

Sunday 9 December 2012

Reduce.. Reuse.. Recycle..

Something I am constantly trying to do!  One thing that I do is recycle old boxes for packaging my slippers and boots (and hats).  I don't just reuse them though.. I make them strong and beautiful in the hopes that the people who receive them will use them as storage boxes, rather than throw them away.

I have been collecting shoe and boot boxes (and anything else which can be adapted) for a while now.. thank you for saving them folks :)  And I certainly know that Kelly was interested in just what I do with them.    I have been rather rubbish at keeping up with my bog lately, but I did take lots of photos after my last big box busting session..  I use old books, magazines, even ordinance survey maps - some belonged to my kids others were being thrown out by a local library most of the time they are damaged or scribbed in..  I would feel guilty ripping up books that were in good condition.. the ones I use are usually a bit nackered in one way or another.

Bad light when I took these so the colours aren't great
 The red square box with a picture of scissors holds the Halloween cauldron I felted a couple of months ago.. the paper is from a really weird kids picture book of modern fables, I just loved the quirky art in it, and it was perfect for a Halloween box :)  The square box at the top left holds my mum-in-laws Christmas hat, she was born and raised in Cornwall.. the paper I covered it with is from old magazines and all relates to Cornwall in Victorian times.

The next box was a lovely size for a pair of tall boots.. I covered it with pages from an old nature encyclopaedia (from the 60s/70s)


 It 'flapped over' to close.. as I wanted it to stay shut I tied it with sari yarn..  I just loved this box!  


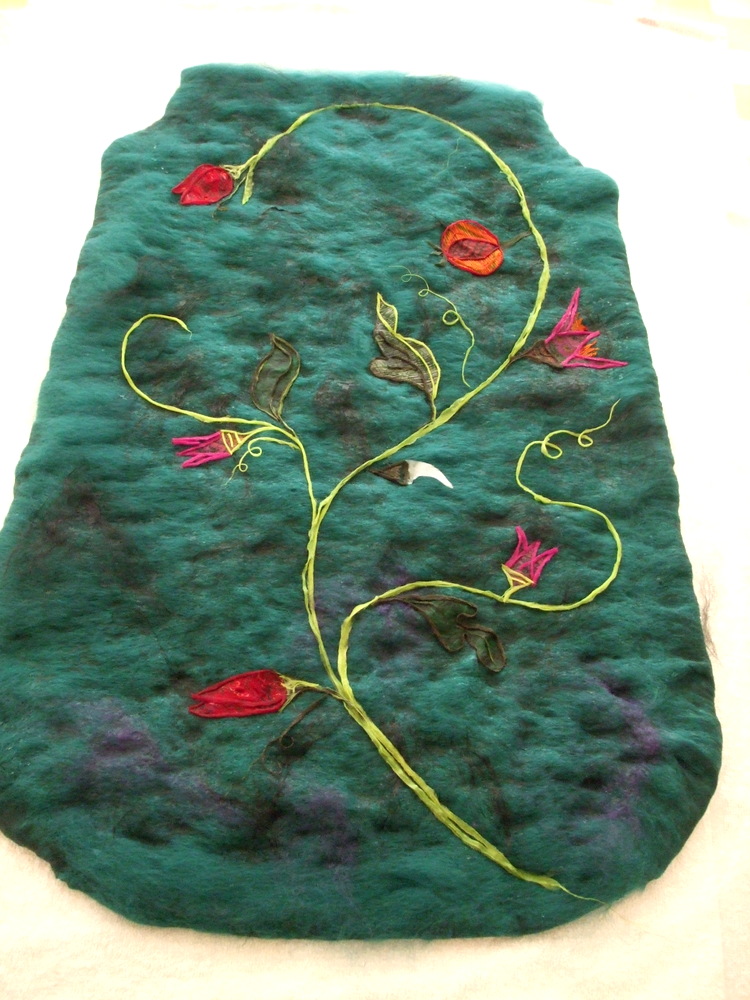
Its on its way to Tasmania now - first time I have sent anything there :)    This is what was inside the box


I always send care information, a short explanation of how I made the felt with a tuft of the fibre used, a personal handwritten note & business card (how I adore my mini moo cards).

All tied up with sari yarn
 Just after I had covered all these boxes, I sold my Faerie slippers to a lovely lady in Canada.. and I didn't have a fairy-ish box to send them in..  I had a spare evening and decided to spend it 'playing'.

Took these at night so the lighting is not good

I didn't have any fairy tale books to use.. but I did have a very beaten up Enid Blyton story book.  It is far to damaged to pass on to anyone, but even though it's only black and white the illustrations are gentle and charming.


Tea staining the pages to 'age' them
Glued on they look rather smart I think.
I coated the box with PVA glue to seal it nicely.


Ready to go
The lady who brought these has emailed to say how much she loves them, which always makes me so happy to hear.  A few days later she emailed to tell me that they are gonna be on Canadian TV!  She was interviewed by her local TV station about online shopping.. she showed them the faerie slippers and their box and they filmed her putting them under the Christmas tree - How cool is that?!  I'm going to try to view it online, but for anybody who is interested and receives the channel it is going to air on Tue 11th Dec - on CTV Edmonton Local news in the consumer watch section.  I am quite excited to be honest.. hope I can find it online.

Anyhoo.. things to do.  Hope you are all enjoying the run up to Christmas
xx

Thursday 29 November 2012

Revisited and Revamped #2

Do you remember my Dragon bag?  I felted it this time last year.. 

from last year
.. and though I was very happy with the shape and style I was never satisfied with the closure!  So a couple of weeks ago it got a make-over :)

Luckily I knew just which shades of fibre I had used... and still have some.  So, I made a matching piece of felt and cut an asymmetrical flap from it.. then decided the top of the bag was a little floppy for my liking and cut a band from the new felt to sew around the inside of the bag, from one edge of the flap to the other edge of the flap.  

I repositioned the ceramic moon button
The flap is hand stitched to the inside of the bag.. Then all round the top (including the join of bag top to flap) I blanket stitched with teal silk thread.


The panel and flap, now that they are in place have made a nice sturdy opening - no more flopping about!

The gold marks show where the integral pockets are..
The reinforcing panel blends in well (the label is stitched to it)
 To close the long tendril wraps around the moon..


I'm really happy with it now.. I like the quirky fastening of wrapping a cord around the moon :)  Its quite secure too, 'specially if wrapped round a couple of times.

So far the only other pieces in the 'redo' basket that I have worked on are pieces of jewellery.. and I haven't photographed them..  it's a work in progress that I can just dip into as and when I get the time.

Right now as I am finishing typing this post I am looking at a glorious winter sunset through the woods.. I love winter sunrise and sunset!  Now I am off to cook a beef stew for dinner yum
xx


Saturday 24 November 2012

Revisiting and revamping.. #1


A few weeks ago I finally reorganised my craft room.. its now just a store room really as I do all of my felting in the dining room :)  While sorting I came across quite a few pieces that had been lurking at the bottom of storage boxes for one reason or another.. some had been to craft fairs and didn't sell, others that I had never been 100% satisfied with but couldn't figure just what needed to be different for them to work for me.  So, I put them all in a basket and have been working my way through them... changing them up.  Here's what I've done so far..


I had 2 simple, seamless pouches which fastened with a cord through the eyelets.  I was looking at this one thinking "hmmmm, what can you become?"  I suddenly thought...  How about an..

OWL!
 I cut the top flap into shape and used lots of appliqué patches..

Leather for his beak makes a strong pull tab for opening his popper.  Harris tweed scraps became wings, and offcuts from the pretty cotton I used to line him was just right for his eyes.. which I finished off with a couple of old plastic buttons.  


I machine stitched the zip into the lining and then hand stitched the lining into the pouch and finished it off with a blanket stitch all the way around the opening.

I forgot to take a photo of the red pouch before starting work!  But it was basically the same as the one above... only red :)  I decided to make a mini-bag out of this one..


Zipped and lined in the same way as the owl pouch
I love the colour combo.. hot red & turquoise, it's not very easy to photograph though..
Green buttons on the bag handles :)
This pouch already had the black heart appliqué . and I really like it so didn't want to take it off... I think it still works..

I like them better now :)

Sunday 11 November 2012

Tree of Life #2

 After laying out the bag and drawing the design took so long, I ended up leaving this till the next day to felt.  I worked it HARD, got loads of shrinkage and a nice sturdy felt.  The sari fabric worked really well for the motifs I think.. these are my favourite bits :)

The pomegranates'
Acanthus leaf

The tussah silk on the inside really lightens it up
The felted bag was just the right size.. with a nice roomy bell bottom and 2 integral pockets.  The only 'problem' was I know that I'd be tempted to everload it due to its size.. and though it could easily carry weight the handles would end up distorting.   They needed reinforcing!

So, I felted a matching piece of felt and cut it to match the shape of the upper part of the bag.  I did it in 2 pieces which met at the sides of the bag.  Carefully pinned then hand stitched it in place.
Blanket stitched handle reinforcing.. and integral pockets.  The mobile phone pocket is near to the top so you don't have to go delving into the bags depths when it rings
both sides

Lovely and sturdy now :)

Project finished.   Tree of Life design out of my head & I'm a happy bunny
x

Tree of Life bag #1

This design had been whirling around in my brain for ages!  

My Tree of Life bag was inspired by things I came into regular contact with in our local museums when I worked there; the bed hangings at the Oak House ( a Tudor House) along with other Tudor & Jacobean crewelwork embroideries seen in other museums.. unfortunately I don't have photos of any of these!  And the William Morris wallpaper at Haden Hill House, William Morris created tapestries inspired by the older Tree of Life and Mille Fleur tapestries.. quite a few of his wallpapers remind me of them too.  Anyway.. that was my inspiration.

SO..  I wanted to make a nice roomy, sturdy day bag.  One that can happily carry everything you need for a day at work, or your knitting / crafty projects for a week away.  

I cut a pretty huge template.. it was getting on for 4 foot long and nearly 1 1/2 foot wide..  I sprinkled lots of green and purple tussah silk on top of the resist, added pocket resists, and laid out 6 layers black on the inside and mallard green outside.  I used a slightly coarser merino fibre than usual to make a heavier felt.

On top of the last layer I drew the design.  Both sides are different.
Design drawn on in merino and tussah silk fibres

One of the features in the Tree of Life embroideries that I absolutely LOVED is that the leaves, flowers and fruits were filled with intricate patterns. 

I used differently coloured and patterned silk sari's to create a similar effect 
 I cut the motifs from vintage silk saris, laid them in place and outlined them with merino.  

All laid out and ready to felt
Finally scattering more purple tussah silk onto the mallard green areas.


I was certainly ready to get felting by the time the design was finished!  It took forever for such a simple looking design.. 


Unrelated anecdote..
..A few years ago I had the task of setting up a William Morris printing workshop for children and families at Haden Hill House, a Victorian House with lots of William Morris wallpaper.. I immersed myself so much into his designs that I came out the other end quite convinced that we absolutely HAD to have some William Morris wallpaper in our living room - thank goodness I got over this before putting any up... I don't think it would have suited our old 3 bed semi :) lol