I'm rather late posting this.. my April project has sneaked into May! Tell you why soon..
I decided to keep my alpaca projects reasonably simple.. since I'm using raw fleece that I have to sort and card I just didn't have the time for preparing enough for a bag or slippers or whatever. I have felted a seamless hat in the past and will put a photo at the bottom of this post.. but I don't have shrinkage details.
ANYway, I decided to make a couple of flat pieces that can be used as table runners.
Both have a design inspired by Nordic petroglyphs. The first one is white leg and neck fibre, coarser than the saddle area.
 |
Design 'drawn' in red merino fibre directly onto the bubble wrap
- using the back/non-bubble side up. I only added the main elements at this point. |
.JPG) |
| Brushing tufts of fibre.. but end first then tips |
 |
Laying tufts out.. this will be the right side. Placed tufts all around the outside
then filled in the centre |
And I forgot to take a picture of the next bit :S I laid 2 perpendicular, very fine layers of carded fibre over the tufts. I peeled layers off the batts and placed them 'as is'. From the couple of alpaca projects I have done in the past I found that it was very difficult to heal a cut edge, so decided to make make a feature of natural edges. I left a border of tuffs extending past the batt layers to form a fringe.
Part way through felting, when it was holding together really well, I needle felted the rest of the design on.
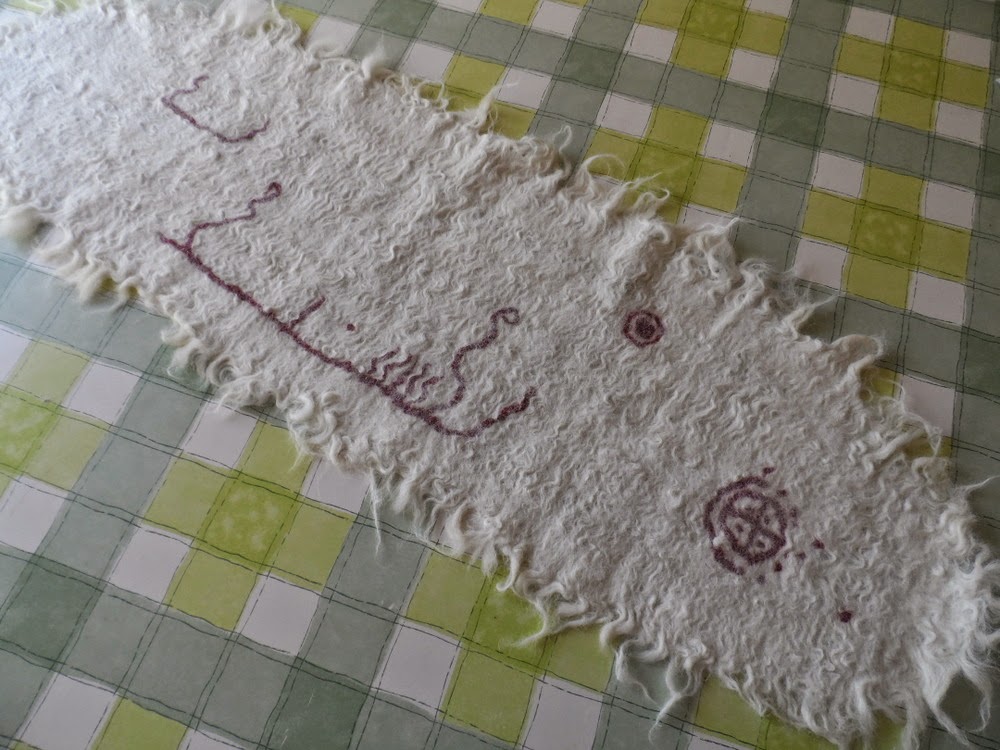 |
| Fully felted. I LOVE the ragged edges. |
The top layer which was placed as tufts is really textural and interesting.. it looks like lots of wiggly locks felted together. The longboats are quite wiggly too.. I straightening them up a little with a felting needle as I went along.
The elements that I needlefelted on stayed in place fairly well.. wherever the wiggly locks tried to distort them I just used a felting needle to tidy them up.
 |
Holding it up to the light shows the texture off well..
you could make amazing lanterns with this! It glows! |
************************************************
For comparison to sampling data:
Layout size: 63" x 18"
Finished size: 45.5" x 16"
Shrinkage: 27.5% x 11%
************************************************
I wanted the second piece to be closer to the thickness of the sample piece..
 |
| I used saddle fibre in white and toffee brown, carded into batts. |
 |
I broke the batts along their length and pulled tufts as I would with tops/roving.
After laying down the first layer I added locks with their butt ends brushed all around the outside.. sandwiching the butts in between the first and second layers.. I used three layers. |
 |
| After wetting down I 'drew' on the boats |
It's worth mentioning that I find with alpaca it's best not to spend much time rubbing. Rubbing as much as I would with wool seams to make the finished alpaca felts surface hairy - which is a pain if there's a design on there. I rub it just enough to make sure it is thoroughly wet, then roll it up, tie it, and start rolling.
Again once the felt was holding together well I needle felted in the rest of the design.. then finished felting.
For comparison to sampling data:
Layout size: 29" x 20"
Finished size: 22" x 15"
Shrinkage: 24% x 25%
Weight: 130g
*************************************************
 |
Last summers seamless alpaca hat!
Using creamy white and oatmeal tops/roving |
 |
| I love old buttons :) |
I find alpaca felts quickly and evenly, into a firm felt which is soft to touch. I'll definitely be using more of it in the future. I just wish it didn't take me so long to prepare! Maybe I'll get faster with practice. Using tops/roving would be more fun.. no prep and no major clean-up operation afterwards (which I always do when using raw fibre).


