Sunday, 5 February 2012

New year - new ideas

I started off January by making a list of themes I wanted to explore this year.. And I actually started working on 2 of them IN January - now thats good going from me! There are a couple of other themes that I really want to work on soon, but I want to show you what I've been upto so far :)  I'm going to be running with these for a while I think 'cos I am really enjoying them.  So far I have started on Petroglyphs & Pictographs and Hundertwasser inspired projects..  and I'm going to start off by showing you my first Hundertwasser inspired bag, which was a nice little learning curve :)

I have been very much inspired by the work of Freidensriech Hundertwasser the renowned Austrian artist.. I love his use of colour and spirals and his love of nature.  If you have a few moments and are unfamiliar with him, please go google.. the site I have linked to is interesting but there is so much more online.. I enjoyed this essay in Hello Magazine.

So far I have kept it simple.. using lovely colours and spirals, nice natural shapes and texture..  My first bags have been inspired by The Big Way painting..

Hundertwasser inspired bag #1
close-up finished spiral
I made my resist with the idea of 50 to 55% shrinkage.  I enclosed my resist in 6 layers of fibre; the inner 3 layers are white Falkland and the outer 3 are coloured merino.  The first thing I laid down was 2 inegral pockets to be on the inside.. with this first bag I just used 3 layers of Falkland for the pockets (forgot to take photos this early). 


 After laying 4 layers of fibre, I added loops to run the handle through..  These were short cords with a fluffy root left at each end, I incorporated the fluffy root in between layers 4 and 5 of the layout stage. 

I didnt position it right at the top of the resist as I wanted room to cut the resist out and even up the top without having to worry about the loops getting damaged or weakened..


 Once all the layers were laid I started spiraling :)  This was the fun bit, it did take a lot longer than I expected though I must say.. laying out a nice spiral takes time!

I drew spirals on the front and the back of the bag using thin lengths ofmerino fibre, pretty BFL slubby yarns and boucle yarn which is an alpaca/wool blend - this is what the dark blue and charcoal is.


These BFL yarns are part of the stash I brought back from Wonderwool last year,
all naturally dyed by Alison at Pure Tinctoria
 

I got so carried away felting that I forgot to take pictures for a while now :(  I dont have any of it partially felted, or as I cut the resist out.

For the handle I wanted to creat a double cord - a big loop that runs through the hanging hoops.. I felted a loooong cord leaving fluffy tufts at each end again.  Onto the cord I twined all the colours that were in the spirals, they twist all along the length.

 And then I felted that - the cord handle has a white Falkland core and 2 layers of merino, then the twist of fibre and yarn.  It was worked in between each layer, but once the twist was on I REALLY worked it hard.. leaving the ends till later.

Internal pockets
The pockets are not as tightly felted as I would of hoped.. I think its to do with the different character of the Falkland wool compared to merino.. and possibly 'cos I only used 3 layers.  This is an area for improvement next time.. 

I am very happy with my bag.. and this one is MY bag :)  a keeper - yay!  I love the way that the white Falkland has crept through to the front making it all heathery - it brings all the colours together - so what could of clashed horribly is actually very harmonious. 

There are a couple of things to tweak for next time..  The hanging loops are strong and stable, but maybe look a little thin on such a big bag - next time make them chunkier!  The handle is super long.. I like that, I can wear it across my body comfortably, if I want to wear it over the shoulder though I would probably have to tie a know to shorten it a little - next time make it a tad shorter.  And the inner pockets need to be sturdier, these are stable enough, but I like them to be tight and even edged, these are a little 'frilly'.

Next time Hundertwasser bag #2

xx


Wednesday, 1 February 2012

ALMOST a cake-tastrophie..

Gary's birthday (Monday) went well..  he loved the folder and laughed his socks off over the horrid hairy helmet!  I was quite surprised while washing up at lunch time to see him strolling into the kitchen modeling it in his birthday suit :)  That was a laugh!  We had a lovely day, and an even nicer night out with most of the family.


My weekend was spent ducking and diving trying to get his cake iced in secret.. easier said than done.  It didn't turn out as I had pictured it.. mostly because there were so many mistakes and mishaps along the way.
 

I had decided to make him a cake with a lady jumping out of the top.. I rather naively thought 'no problem - it'll be an interesting challenge' HA.  What I didn't take into account is how long its been since I iced a cake (7 or 8 years) and the simple fact that I was having to do it on the sly and hide it away from my husband!  (I don't want to bore you.. the rest of this post is my catalogue of mini cake-related disasters.. so please stop here if you aren't that interested :)

I made the lady from icing and painted her in a nice peach foodcolouring; I used it for her skin, hair and bikini.  Stupidly I decided to paint the back of her bikini while she was laying face down on a soft towel.. of course when her bum was dry and I turned her over to find she now had a boxers nose (flat)  Never mind..

We don't like icing or marzipan on our cakes, so I decided to just use a thin layer of icing.. I knew this is what I always used to do.  What I forgot is how I used to cover the cake with butter-cream icing BEFORE putting the rolled icing on to smooth out the surface.  I did have a vague recollection of brushing apricot jam glaze onto the cake before icing it.. and did that.  Of course when I put the icing on I couldn't smooth the darned stuff out no matter what I did!  I ran out of time at that point and had to leave it till the next day.

The only thing I could think of to try and save it was frosting, which I've never used or eaten before (but now really like!) I brought a can of American Frosting thinking I could smooth it over my bumpy sponge cake to get a nice smooth surface.  I tried to make it blue.. after adding a couple of spoons of the cheap blue foodcolour brought from our local supermarket I got the blue-ish grey you see above, I think I could of added the whole bottle and just about got a true blue..

When I tried peeling the icing back off - the apricot glaze had virtually welded it onto the sponge!  I eventually got it off and started dolloping frosting on .. only to discover that it doesn't really like being 'smoothed' onto cake.. I could NOT get it flat.  The more I tried the more it started coming back off and bringing crumbs with it.  So I took a fork to it and make swirly patterns and covered the worse messy bits with white chocolate stars. 

I was getting in quite a panic, thinking OMG how can I take this to a restaurant to be carried out and presented to him in front of everybody? 

I decided to keep going and see how it turned out.  I stuck my iced lady into the hole that I had cut and stood back to look....and she started leaning back further... and further..  till she broke in the middle - oops.

Which is why she ended up so deeply stuck in the cake that she looks more like a swimmer waving her arms for help... maybe I should of added an iced sharks fin swimming up the side of the 'waves' he he.

Anyway..  When it was all done I thought it wasn't too embarrassing after all.. and in the end everyone enjoyed it and the only thing Gary was embarrassed about was us singing happy birthday (and the big flashing 40 badge his sister made him wear :)

xx


Friday, 27 January 2012

A very SILLY present :)

As mentioned in the last post, my husband is rapidly approaching his 40th birthday, just 2 days left to go.  Presents were needed - I thought long and hard and came up with the handprint project I showed you last time.. but I wanted to make something FUN too.. something a bit silly. 

One thing with Gary - he likes his hair neat.. short, and neat.  As soon as it starts getting long enough to curl, or stick up.. it must be cut.  SO, I decided to make him a hat :D  a big.. mad.. HAIRY hat.

Scoured locks laid tips down,
 this is a shetland/jacob cross fleece
 I used the resist I normally use for berets (not the oversized ones, the more fitted type).  Laid the locks to cover it the added merino tops to cover the locks.
Nice brown and tan merino, layer 1

Layer 2 radiating out from the centre
 And somehow I seem to of either forgotten to take the photos of the next stages, or deleted them from the camera!  I flipped it over folded the edges in and laid the locks & merino in the same way on this side.  Then felted it the same as any other resist project.

In hindsight the beret resist was still a bit too big.. I had to work the thing so much that it actually became more of a HELMET than a hat :)

Well its certainly silly - bordering on MAD I think lol
My sister-in-law is hoping that he will wear it to the restaurant when we all meet on the night - not very likely.  Actually, fun though it was to make, I can not imagine Gary wearing this in public unless he is going to a fancy dress party as Dennis the Menace, or Sideshow Bob.  I'm just looking forward to the fun we shall have when he opens it :) and seeing him with big hair.

Today I have been baking madeira sponge cake.. which I shall be sneakily icing and decorating over the weekend.  OMG I have just realised - I dont have Monday to work on it - Gary has booked his birthday off of work - YIKES...  I am going to have to work hard and fast while he is golfing on Sunday!

xx

Saturday, 21 January 2012

January.. the month of many birthdays!

The birthday run down for January; dads is the 9th, sons the 15th, nephew 19th, mother-in-law 24th, husband 30th & brother-in-law 31st.. its a busy month.  And of course I have been making gifts.. not for everybody.. but I crocheted a couple of hats for my mum-in-law and felted slippers for my dad..


Its my lovely husbands 40th birthday.. I didn't really know what to give or make for him.. but I thought long and hard and came up with a couple of ideas.  This is the more sensible pressie I've made :D 

Whenever I get into my hubbys car after work, I have to move an armful of paperwork off the passenger seat first. Soooo I decided to make him a nice felted wallet / folder to keep it all nice and tidy.  I didnt want it to be boring, or silly either (can't have him embarrased if his boss needs a lift now can I?!) 

SO, I decided to make it nice and bright, and decorated with our handprints..

Decided on 3 nice colours that went well with the base batts & made prefelts

Stupidly I was suprised at our handprints..
wasn't it just last year that the kids hands were half the size of mine?
Which is which?
 As all of our hands are pretty much adult sized now I decided to felt them in so that they shrunk down with the felt - I think they would of dominated it too much otherwise.

Some of my favourite slubby red yarn wound around the hands. 
All wetted out & ready to go

Felted nice and hard to withstand wear and tear

Look how tiny my handprint is now .. its like a 8 year olds! lol

Trimmed the 2 long edges and machine stitched (twice) up each side

Secret messages freemotion machine embroidered on the inside cuff..

where nobody else will see them.

Finished with a vintage button from a button tin Gary gave to me..
the colour is perfect for picking up the duckegg handprints
 I made the buttonhole on my sewing machine.

Finished.. hope he likes it
I have also made a very silly present too.. but I think I shall save that for next time :)
TTFN x

Sunday, 15 January 2012

Making Mittens

I hate having cold hands!  One thing that always freezes my fingers to the point that I could cry is scarping the ice off my cars windows.. so I decided to felt an ice-scraper mitt; a thumbless mitten with the handle of the ice-scraper going through to the inside where you hold it and keep warm.  I didnt take process pics, but made 2 at once by using a double resist which I cut in half part way through felting.. giving me 2 scraper mitts

I cut a slit at the end & 'healed' the edge as I was felting.. this is where the scraper goes
 I decided to give these to my aunties for Christmas.. hope they liked them (I havent seen them yet)  They should be good for ice-scraping as they wont get wet.

Now I needed to make for myself.  Oraigionally I planned to make a thumbless mitt, but I have I've always fancied a pair felted mittens that I can wear out and about.. last time I tried it turned out like a felt boxing glove lol (I'd used way too many layers!).  Also I wanted the thumb to be positioned slightly to the front rather than at the side..  Gary solved this for me very simply, he pointed out that I can turn it slightly as Im working the felt so the thumb is where I want it.

covering the double resist with nice golden orange merino

I used 3 layers.. so it would be thick and warm, but still flexible

On the 2nd and 3rd layers I added blue for the hands
keeping the orange clear for the wrists

For surface decoration I used a pink and yellow silk cap that I dyed a while back
and some pretty variegated finger roving brought back from Wonderwool Wales

Wetted and rolled, just about to cut them apart

healing the edges

After working the left mitt look at how much it shrunk after it came off the resist

Finished front and back
Generally I am really happy with these.. I shall tweak the resist next time to make the finger area slightly narrower.  When I made these I didnt want them to restrict my fingers, but I think there is just a little too much room there.  I may wet them and work the fingers a bit more yet. 

Safe to say there will be more mitten making in the future :)

Wednesday, 11 January 2012

Time flies!

And once again its been ages since I blogged - I really must get back into the habit!

Before Christmas, I went with my friend Brenda into Birmingham to visit the German Market.. a huge Christmas market that is there each year for the month or so leading up to Christmas.  We had a lovely time and spotted lots of lovely things.. the best treats of course were the real handmade /artisan made stalls.  There was an Egyptian potter with exquisite wares, a stall with hand knit socks (that looked soooo warm and snuggly) and hand woven scarves in camel, mohair and yak, both of whom we had a good chat with.  A stall selling the work of several local Birmingham artists which was very nice to see, and the glassblowers from the Jinney Ring were there too (also local to me)  I hope that they all did well. 

There was also quite a bit of felt.. but that was a bit of a downer to be honest, from what I saw all of it looked to be cheaply brought imports being sold on still at too-low prices.  It makes me sad and irritated at the same time; sad when I think of how little the makers will of been paid for their hard work (must be pitifully little seeing what the end sellers are asking) which makes me irritated at exploitation, and then also irritated at how this practice devalues felt!  Not good!!

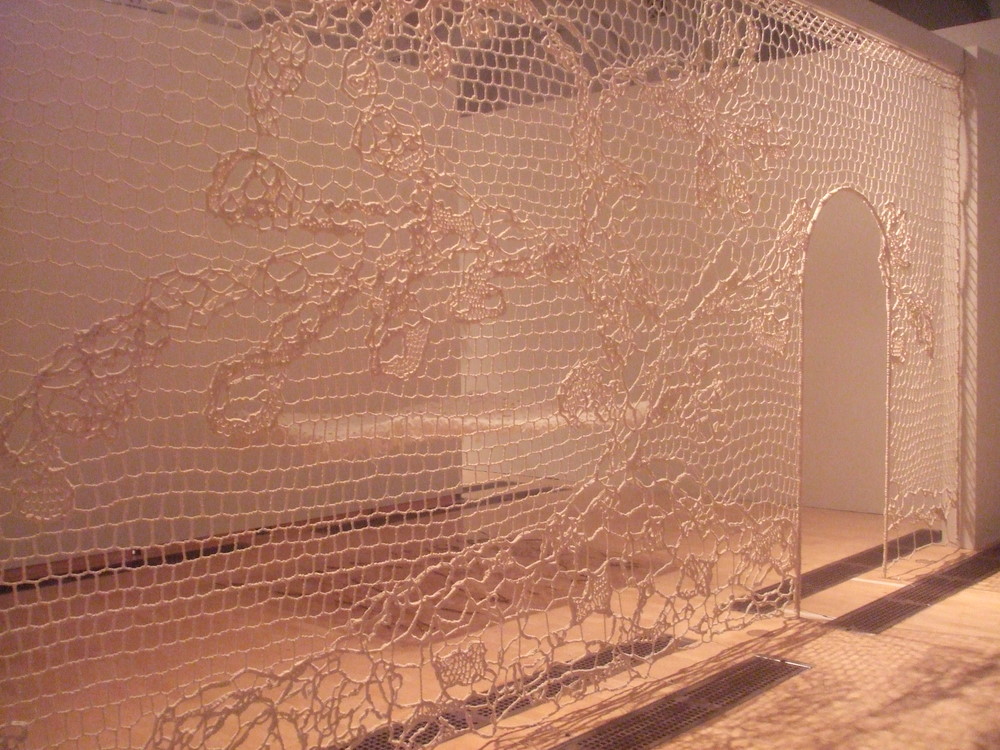
We also visited an exhibition at Birmingham Museum and Art Gallery - Lost in Lace.  Quite an interesting take on 'lace', there were pieces there that I really am not too sure quite how they relate to or were inspired by lace.. but there were also some stunning pieces.  Anyone who finds themself in the vicinity its worth taking a look - especially as its free entry!  Very glad to say photography is allowed so here are a few pics I took..


My favourite.. I found this intriguing.
Entitled ' After the Dream'
These wedding dresses are really tall & behind an intricately woven spiders web created from string, which must of taken forever to create!
It reminds me of old, crackled photos..
 
Stunning HUGE chandalier created from 600 swarovski crystals..
I can't even imagine how difficult this installation was!

Beatiful Panel with walkthrough archway created in needlelace.
You can just see the 'flying carpet' behind it

This is the first thing we saw.. beautiful, peaceful and so graceful
These columns are suspended, and they just keep on going up and up!


Saturday, 24 December 2011

This Christmas Eve...


I would like to wish you all
a Happy Christmas
and
Peaceful New Year


With lots of creative fun for all! :)
I would also like to thank you for stopping by my blog, to those who have commented on my posts a special thank you - it has been a pleasure hearing from you

Love to you all
Deborah xxx


Thursday, 22 December 2011

Lots of felty photos..

I have been 'away' for so long that there are quite a few makes that I havent shared..  time to catch-up a little :)  As you will notice I fixated on a couple of colour combos.. you saw the black & white and purple & petrol big fringed scarves a while back - I loved these so much that I really HAD to make more in those colours..
This shawl/poncho has one of my new Buttonalia buttons :)   Black and grey merino with lots of silk; silk laps & throwsters waste, white flax (linen) fibre and boucle yarn

This plump little black & white beuaty is just right. 
I felted decorative holes which double up as button holes.

I hate modeling hats!

Pin brooch

LOVE these colours!  The mulberry silk looks lovely I think

Note to self.. pull jeans up before having photo taken from behind!
 And especially for you Heather :)  BOOTS

Turquoise blue and red.. in my head I think of these as SuperHero boots - they are the right colour I think!

Pumpkin boots
And I've got a couple of other makes tucked away until after Christmas..

TTFN xx

Sunday, 18 December 2011

Finally a finished Dragon Bag :)

I have been a baaaad blogger lately! With the run-up to Christmas I haven’t had time to post or keep up with the blogs I follow.. Its time to catch-up, and the first thing that I want to do is show you the finished Dragon Bag :)


There are 2 integral pockets, just right for keeping track of little bits like a mobile phone and make-up. I put the mustard coloured fibre down as a guide for when I cut the pocket resists out.. I’m glad I did – its a nice splash of colour in a very dark interior!


I used leather inside the bag to strengthen the places where the handle cord passes through the felt, and for the fastner loop.

This took me a while to finish, as I mentioned last time I changed my mind about using the felt & leather button I had made (it really wasn’t very good) – luckily for me the lovely Sharry of Buttonalia is much better at making moons than I am :)  . She has created two big fat full moons for me.. along with quite a few other lovelies, these are the ones I haven’t used yet


I also changed my mind a couple of times about how the handle should be. Firstly the 2 cord ends were joined on top and hidden beneath a leather cuff – after a couple of days I took that apart, thinking to knot it leaving the 2 ends hanging down on one side, and to create a felt dragon to wrap around holding the cords together at the shoulder. When I actually knotted the handle in place I like it as it is.. I think the shoulder dragon would be TOO much.

I’ve used felt, leather and ceramic for this bag.. its nice using different materials, makes it very tactile. I’m very happy with how it turned out, and have plans for a few other bags in the same vein.


I have a few other things to share with you over the next couple of weeks.. some before and some after Christmas. For now I am off to try and figure out how to crochet a newborn baby cardigan. I have been searching and searching for a knit and a crochet pattern for a SIMPLE newborn cardi – round neck and 2 or 3 buttons to fasten.. can I find what I want? NO. So, Im going to try and work out my own crochet pattern today (I’m much more confident with crochet) and tomorrow I shall try my luck at the local library.. see if they have anything in their baby knit books.

xx